
Multi-Node Ingest
Duration: 4:35
Multi-node ingest lets you bring structured data into multiple CORAS nodes simultaneously — a critical capability when onboarding large datasets from spreadsheets, legacy systems, or data calls. Instead of manually entering data item by item, you can map columns from a source file to CORAS fields and push data across your node structure in minutes. GARY can also assist with data transformation, analyzing uploaded datasets to identify issues and apply corrections before ingest.
Before You Start
File requirements:
Excel files must be smaller than 20 MB
CSV files must be smaller than 50 MB
Your file must include a column that specifies which node each record belongs to. Values in that column must exactly match CORAS node names — records without a valid match will not be ingested.
If your file doesn't have a node column, add one before uploading.
Starting the Ingest Process
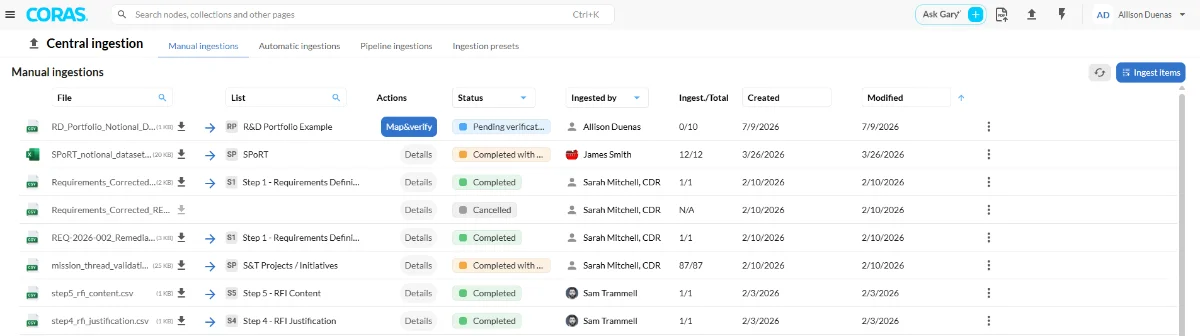
Central Ingestion has four tabs: Manual ingestions, Automatic ingestions, Pipeline ingestions, and Ingestion presets. This guide covers manual ingestion.
Click the Central Ingest icon at the top of the CORAS screen.

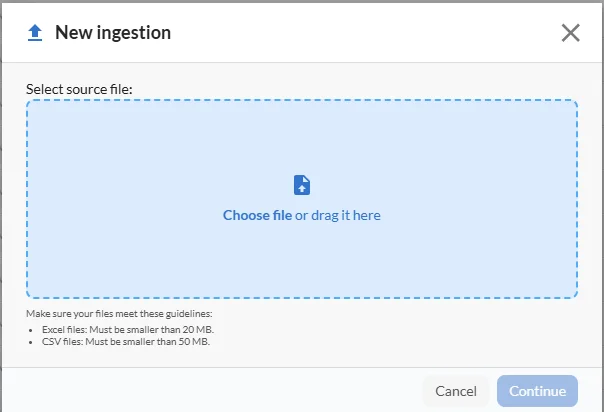
Click Ingest Items
Select your file or drag and drop it into the upload box
Click Open, then click Continue

Selecting the Sheet and Header Row
Excel only — skip this step for CSV files.
If your Excel file contains multiple sheets, CORAS can only ingest one sheet at a time.
Use the dropdown to select the sheet you want to ingest.
Select the header row — typically row 1.
Click Submit File.
Click OK in the Stages History flyout to confirm. Your file is now in the queue. Refresh the page using the refresh icon until the status changes to Analyzed.
Configure the Multi-Node Destination
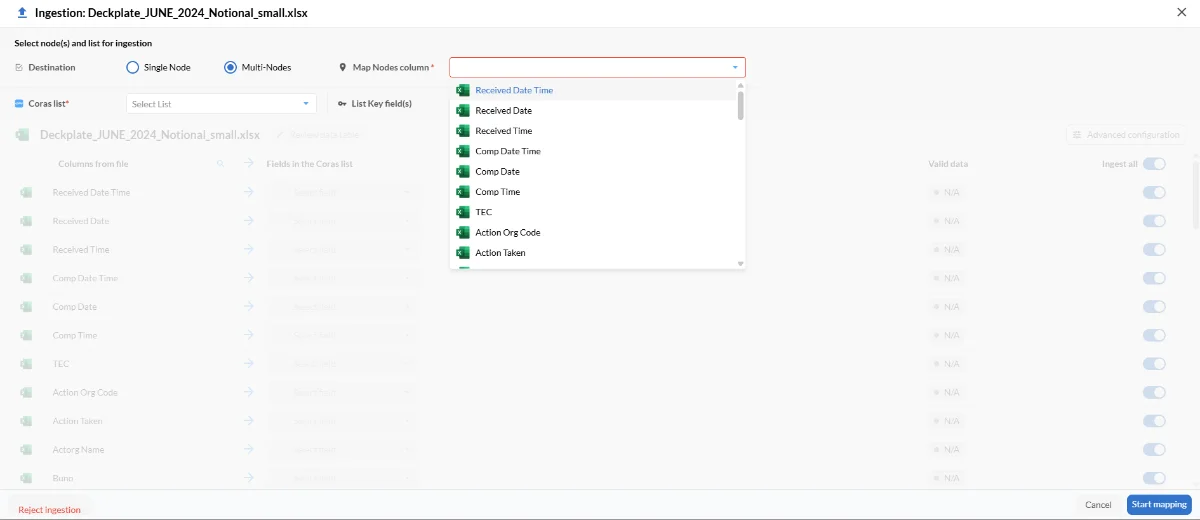
Under Actions, select Map List
Select Multi-Nodes as the destination type
From the Map Nodes Column dropdown, select the column in your file that contains node values
In the CORAS List dropdown, select an existing list or choose New List and enter a title
Set the List Key Field
Choose one of three key field options:
Autogenerated — CORAS generates a unique key automatically — use for new lists that won't need record-level updates
Custom — Select one column that contains unique values — use when a single field identifies each record
Compound — Select multiple columns that together form a unique key — use when no single field is unique on its own
Select a key type
Choose the key column or columns
Select the uniqueness level — Tenant (unique across the entire tenant) or Node (unique within each node)
Verify Field Types
CORAS auto-matches columns from your file to list fields.
Scroll through the column mapping and verify each field matches correctly
Check that field types are accurate — if a field is set to Status but should be Start Date, click the field type and select the correct one
Toggle off any fields you do not want to ingest
Click Start Mapping
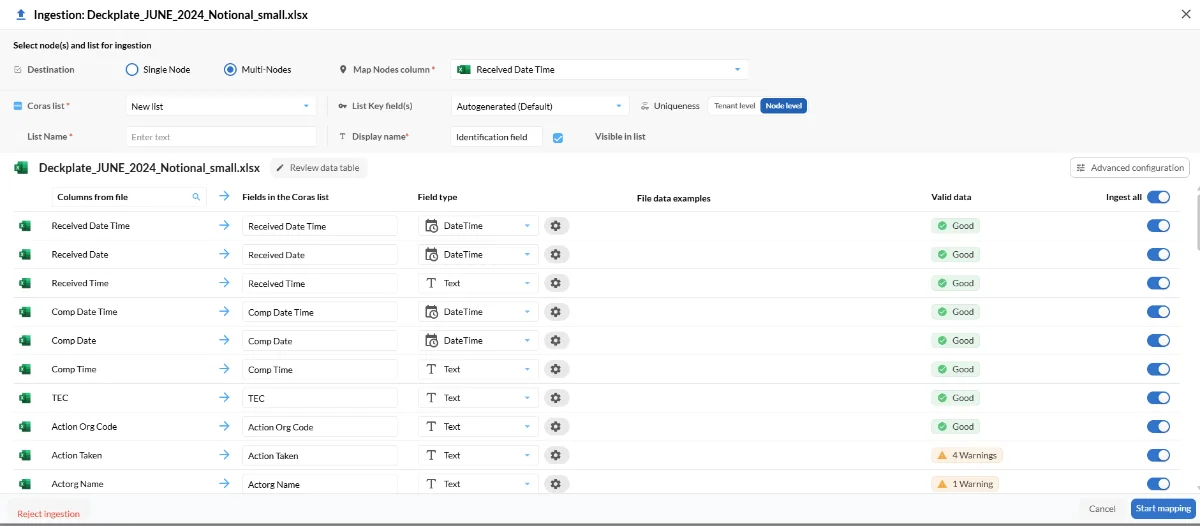
Validation status for each field:
Good — ready to ingest
Warning — may require attention but not blocking — hover over the warning icon for details
Error — must be resolved or the field must be toggled off before proceeding
Map and Verify
Click OK — the list returns to the queue
Refresh until the status changes to Pending
Select Actions → Map and Verify
Verify all nodes show a green check mark and click OK
Verify all items matched — click Next
Confirm statuses match — click Next
Confirm priorities match — click Next
Click Process, then click OK
This step is final. Ingestions cannot be undone after clicking Process.
Completing the Ingest
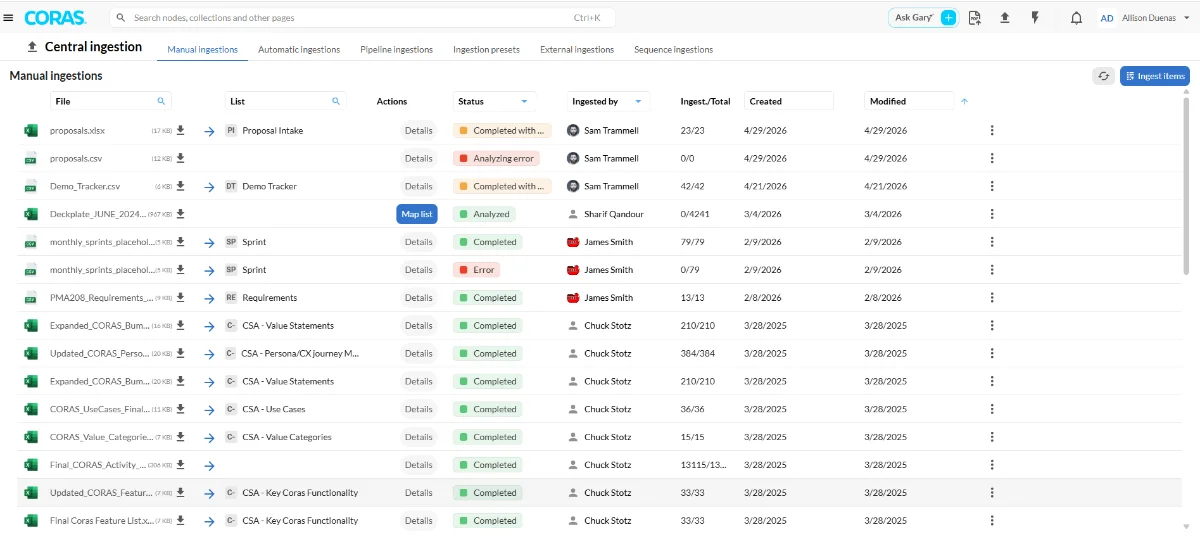
Refresh the page until the status reads Completed. Your multi-node ingest is now complete. Status options:
Completed — all records ingested successfully
Completed with Warnings — ingested with non-blocking issues
Completed with Errors — some records may not have ingested
View Ingestion Details
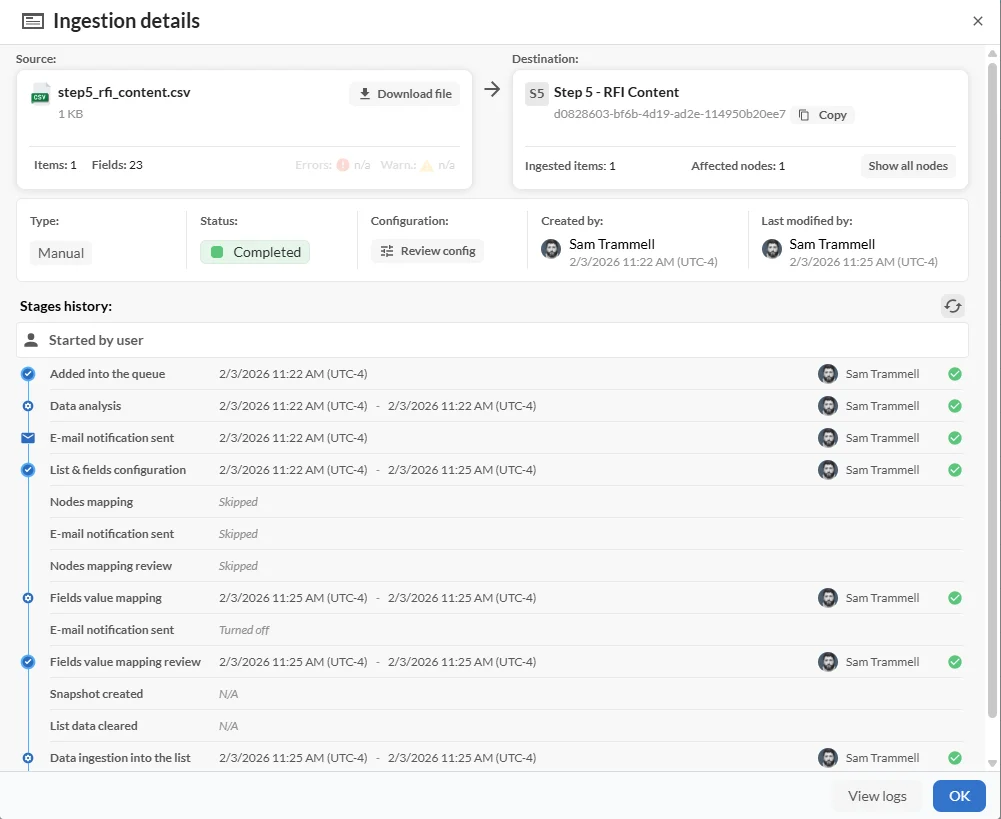
Click Details on any ingestion row to open the Ingestion Details panel. This is where you go to review results and troubleshoot.
The panel shows:
Source — file name, size, item count, field count, and any errors or warnings
Destination — list name, ingested item count, affected node count, and a Show all nodes button for multi-node ingestions
Type and status — Manual or Automatic, and the current status
Review config — reopens the field mapping configuration to inspect how columns were mapped
Created by / Last modified by — who ran the ingestion and when
Stages History
The Stages History shows every step of the ingest pipeline with timestamps and completion status. Stages include:
Stage statuses:
✅ Completed — stage finished successfully
Skipped — stage was not applicable for this ingestion type (for example, Nodes mapping is skipped for single-node ingestions)
Turned off — feature is disabled for your tenant (for example, email notifications)
N/A — not applicable for this configuration
Click View logs in the Details panel for a full technical log of the ingestion if you need to troubleshoot a specific failure.
View Ingested Items
Return to the Map view.
Hover over any node used in the ingestion.
Click Navigate To, then select the List view tab.
Search for the list by typing the beginning of the list name.
Click the list name to view its ingested items.
In a multi-node ingest, items are distributed across nodes based on the node column values in your source file.
Row Menu Options
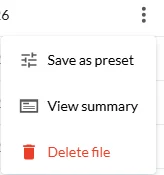
Click the three dots (⋮) on any ingestion row for additional options:
Save as preset — saves this ingestion configuration for reuse. Presets appear in the Ingestion Presets tab and let you skip reconfiguration for recurring ingestions using the same file structure.
View summary — opens the same Ingestion Details panel as the Details button.
Delete file — removes the file and its ingestion record. This action is permanent.
Ingestion Presets
The Ingestion Presets tab stores saved configurations from previous ingestions. When you run a recurring ingestion with the same file structure, select your preset instead of configuring the mapping from scratch.
To use a preset:
Go to Central Ingestion > Ingestion presets.
Locate your preset.
Start a new ingestion and select the preset when prompted during configuration.
Best Practices
Add the node column to your spreadsheet before uploading — do not try to add it after the file is in the queue.
Node column values must exactly match CORAS node names — check spelling and capitalization before ingesting.
Use Save as preset after any ingestion you expect to repeat — it eliminates reconfiguration time on future runs.
Refresh the page regularly throughout the workflow using the refresh icon in the upper right.
Resolve status mismatches in Administrator Settings before ingesting when possible.
If an ingestion completes with errors, open Ingestion Details and check the Stages History — the failed stage and error count narrow down exactly where to look.
Get Help
Contact your CORAS administrator or Customer Success Manager for support with multi-node ingest configuration and troubleshooting.