
Transfer Items
Programs evolve. Teams restructure. Mission areas shift. When they do, your data structure needs to keep up — and manually moving records one by one isn't an option at scale. Transfer Items lets administrators move filtered records between nodes in bulk, keeping your data ontology aligned with organizational reality without losing a single field value, attachment, or history entry.
Why This Matters
Organizational changes happen faster than anyone plans for. Transfer Items means your CORAS structure can reflect the new reality the same day the decision is made — not weeks later after someone manually reassigns hundreds of records.
The filter-first approach means you move exactly the records that qualify — not everything in a node, not a manual selection. Define the criteria, confirm the results, transfer with confidence.
Nothing is lost in the move. Field values, attachments, and history all travel with the record to its new node.
When to Use This
Reassigning records when a program moves from one office or command to another
Transferring ownership or responsibility across nodes during a personnel transition
Reorganizing your node structure after a workspace or mission area realignment
Step 1: Navigate to Transfer Items
Go to Admin Settings and select Transfer Items under the Data Cleansing section.
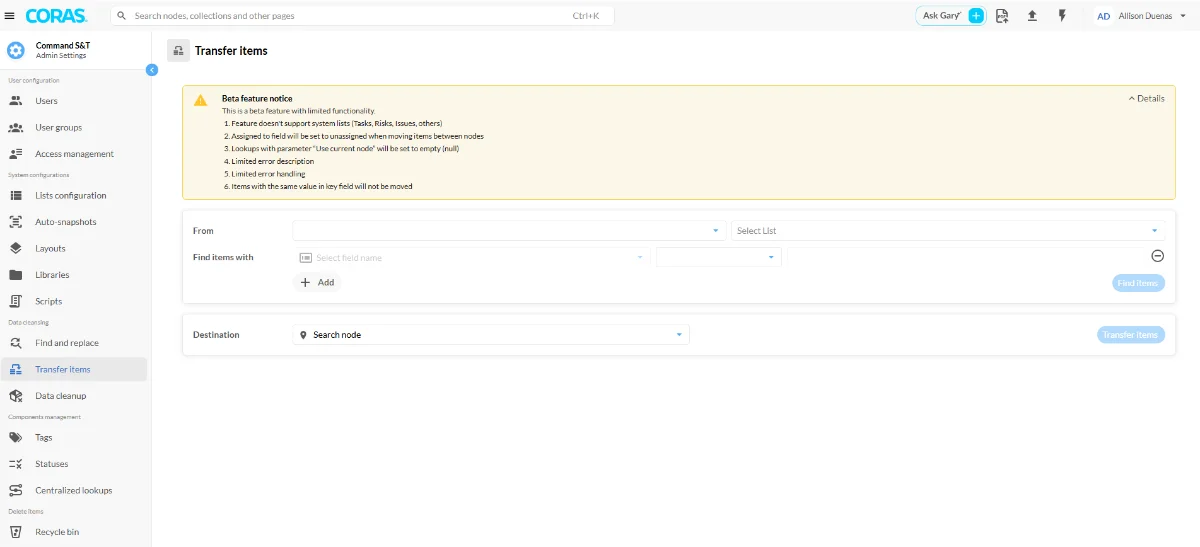
Step 2: Select the Source Location
In the Location From section:
Use the left dropdown to select the node or nodes where the source records are currently located — you can select multiple nodes
On the right, choose the List containing the records you want to transfer — only lists tied to the selected nodes will appear
Step 3: Define the Filter Criteria
In the Find Items With section, configure which records should be transferred:
Field — choose the field to filter by — for example, Status, Owner, or Priority
Condition — select the appropriate condition:
is equal to
is any of
is none of
contains
does not contain
and other options depending on field type
Value — the third box updates based on your field and condition selection. Enter or select the specific value to filter on.
Click + to add another filter row. Click — to remove one. Stack multiple conditions to narrow the transfer to exactly the records you need.

Step 4: Find Matching Items
Click Find Items. Results appear at the bottom of the screen showing the number of matching records and a preview of the items that will be transferred.
Review the results before proceeding. Confirm the records shown are the ones you intend to move.
Step 5: Set the Destination
In the Destination section, use the dropdown to select the target node where the items should be moved.
Step 6: Execute the Transfer
Once your source, list, filter criteria, and destination are confirmed:
Click Transfer Items
The system processes the request and moves the filtered records to the destination node
The transfer is complete. Moved records retain all field values, attachments, and history in their new location.
Get Help
Contact your Customer Success Manager or visit the Customer Resource Center for additional support with Transfer Items and data management in CORAS.